I have several ICOM transceivers including the popular IC-706MkIIG. Programming the 106 memories of the 706 can be a laborious task if tackled via the control panel on the transceiver. I wanted the ability to create a spreadsheet of frequencies and settings on my laptop and download these to the 706. In this article I’ll describe both the hardware and software to achieve this.
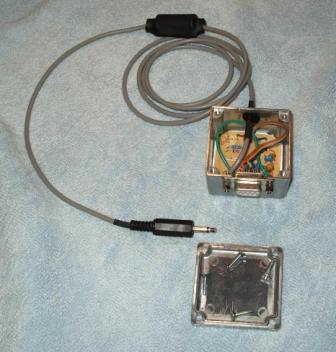
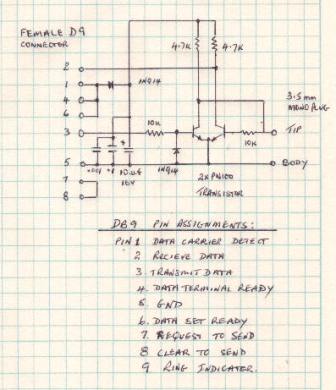
After a short time researching the “net”, I came up with a hardware interface and a software program to carry out this task. The schematic and photograph show the circuit and physical layout of the interface I built. Total cost about $15. An advantage of this design is that it is “self powered” from the “COM” port of the PC or laptop, rather than requiring a separate power supply.
Although I chose to enclose the PCB in a metal box, the design on the net shows the PCB in the shell of a DB9 connector. The advantage of this is that rather than having a separate box and RS232 cable as I have, you need only a single “programming cable”.
The way my interface works is to connect it to a PC or laptop via a “straight-thru” (not a NUL modem cable) RS232 cable. The mono 3.5mm audio plug goes into CI/V port in the back of the ICOM 706. Once you have created the file to set the frequency, mode, etc. for each memory, you download the file to the 706. The download of 100 memories takes less than one minute.
By the way – No, the interface did not devour a small furry animal for breakfast, the bulge in the cable is a ferrite sleeve, through which the shielded cable has been passed a couple of times. A wise precaution for any electronic device in the “RF rich” environment that we play.
Oh, I believe that this interface will work with Yaesu equipment with a different audio style plug on the shielded cable. (not tested by me).
There are many very good software programs on the “net” to program and control most brands of amateur radio equipment. I wanted something simple and quick to use, so I chose “706 Memory Manger”, written by G4FEV.
The program takes an MS Notepad file as its input. The program is quite small and is extremely well documented with a test program to ensure that your computer can communicate with your transceiver, plus several demonstration files and it’s free!
Each line of the file contains parameters to set the frequency, mode, split and filter setting for each memory.
The format is:
Transmit frequency, Receive Frequency, Mode (FM, USB, LSB, etc.), Split on/off (Repeater operation), Filter setting (wide/narrow), plus comments to help in understanding the purpose of each line of the program, at a later date.
The way I went about creating the comma delimited input file was as follows:
1. Create an Excel spreadsheet with a column for each parameter plus comments and a line for each 706 memory
2. Entered the data for the 100 memories
3. “Saved” the spreadsheet as a comma delimited file
4. Copied this file into the demonstration “Notepad” file provided with the program.
Like most things in this life, the program is not perfect. It was written for the original 706 which had only 102 memories, so won’t load the full 106 memories of the 706MkIIG. A small price to pay to have to load the remaining 4 memories via the 706 panel.
Well there it is. I hope you enjoy reading this article and I am happy to assist anyone who might be interested in constructing their own interface.
Happy Homebrewing!
Bob VK2ZRM
References:
1. www.plicht.de/ekki/civ/civ-sch1.html (this is the original schematic)